
How to Setup a Google AdWords Remarketing Campaign !!!
Remarketing campaigns through Google AdWords offer advertisers an additional tactic to drive potentially high value visitors back to their website in an effort to grow overall conversion figures.
Remarketing campaigns allow businesses to stay connected with their target audience after they leave their website by showing ads to them on other websites across the web.
Users who have already visited your website are likely to be more engaged with your brand messaging and offering after their first visit. Typically, returning visitors browse more pages and convert more often when coming back to a website after their first time. That said, re-marketing can be an extremely powerful tool when working to increase the ROAS (return on ad spend) of your pay-per-click marketing efforts.
While re-marketing can be a powerful channel for digital marketers, setting up your first campaign can be a challenge. To help with that, we’ve provided a step-by-step guide to create your first Google AdWords re-marketing campaign.
Step By Step Guide to Create Adword Re-Marketing Campaign
There are three core components of setup required to create and activate a re-marketing campaign for your Google AdWords account.
- The first step is to create an audience to re-market to. This re-marketing audience is used to pool website visitors who then can be re-marketed to. Called a ‘remarketing list,’ the audience specified is essentially a collection of users who qualify based on requirements set by an advertiser.
- The second step required in this process is to create a re-marketing campaign within your Google AdWords account. Creating this kind of campaign is similar to the standard campaign setup in AdWords.
- Lastly, advertisers need to add a series of text or image ads into the created campaign. Through this blog post, we will show how to upload image ads into your campaign for re-marketing purposes.
Create a Re-marketing List in Google AdWords
After logging into your Google AdWords account, click the ‘Shared Library’ link in the lower left navigation bar.

Then click into the ‘Audiences’ section

If this is your first time re-marketing, you will need to add a re-marketing tag to your website. This small snippet of code allows for visitors to be tagged with a cookie required for your re-marketing ads to be shown to them once off your website.

If you click through to ‘Tag details’ you’ll be able to access a tag that you can install on your website.
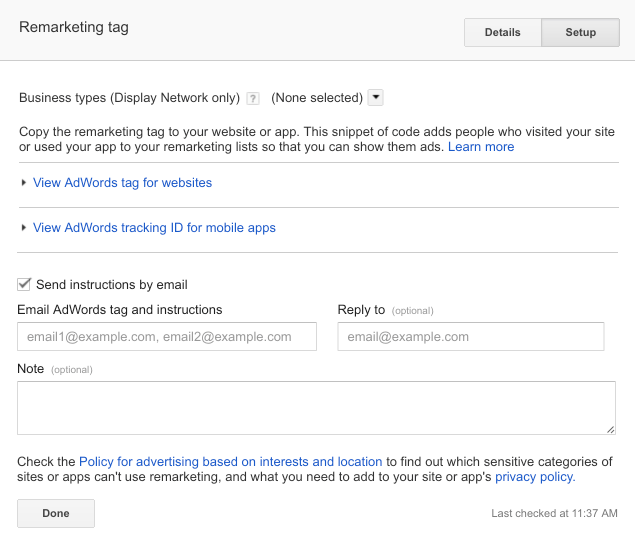
You can email this tag to your technical support team, if you do not feel comfortable installing it. Make sure this tag is installed on every web page on your site. Doing so will give you more freedom to run a variety of re-marketing campaigns to reach your ad group.
In any case, once you’ve installed the tag, you need to create a ‘Re-marketing list.’
To do that, click on Re-marketing List,’ which can be found in the Shared library section.

You then have to decide how AdWords chooses who it will re-market to, by telling it what data you want it to use

What you pick here will depend on the data that you currently have/can supply.
Let’s take a look at how you can set up a re-marketing campaign that’s based on the ‘Website visitors’ option.
Make sure that you give your Re-marketing list a specific name, so that you can quickly identify what the purpose of the list is, when you go back to check on your campaigns.

Once again, your campaign goals will determine who you should add to your re-marketing lists.

If you want to take full advantage of these options, you need to make sure you have installed the re-marketing tag on all of your web pages.
Once you’ve decided on an option, you need to provide the relevant URL that matches what you’re trying to achieve.

Re-marketing Campaign in Google AdWords
Once your re-marketing list has been created, it’s time to turn your attention to creating the re-marketing campaign in AdWords. To initiate the process, navigate to the ‘Campaigns’ tab of your AdWords account and click the ‘+Campaign’ button. Then select ‘Display Network only.’

Next, name your first ad group (typically the same name as the audience you created), set an initial default bid, and then select ‘Interests & re-marketing’ as the targeting option. Once selected, a drop down will appear. Select ‘Remarketing lists’ as the targeting category.
Click the arrow to the right of the ‘All Visitors’ list to select it. Completing this process has now assigned the re-marketing list you created to the re-marketing campaign being put together.

That’s it! After creating your re-marketing list, re-marketing campaign, and uploading your ads, your campaign is all ready to serve ads.
Please keep in mind that when adding image ads, Google usually puts those through a review process. During that review, your ads will not be eligible to show. Typically that review process is no more than 24 hours long.
Digital Media Booster– One of the Top Re-Marketing Agency in Pakistan


